The cookie settings on this website are adjusted to allow all cookies so that you have the very best experience. If you continue without changing your cookie settings, we'll assume that you are happy to receive all cookies on our website. However, if you would like to, you can change your settings at any time using the Change cookie settings link in the Special menu. 
    
 
+44 (0)20-84520161 Contact Us
Now FREE Delivery on UK mainland orders over £30+VAT

Ultrasonic Ranging Module for Arduino

  • Details

  • Recommended

  • Send

Details

Item Number
HCSR04
Item Condition
New
Price
£2.50 (inc VAT £3.00)

Options

Quantity


  • 4700pF 63V Ceramic Plate/Disc Capacitor

    4700pF 63V Ceramic Plate/Disc Capacitor

    Ceramic Disc 63VDC 5% 2.5mm spacing 4.7nF (4700pF)

    CER4N7
    £0.12
  • CD4047 Integrated Circuit (IC)

    CD4047 Integrated Circuit (IC)

    CMOS Mono Astable Multivibrator 14DIL

    CD4047
    £1.50
  • PT10B2K2

    PT10B2K2

    Horizontal Preset Carbon Small Dustproof, 5 x 10mm spacing 2.2Kohms
    PT10B2K2
    £0.25
  • 7 Segment Display Common Cathode High Efficiency Red 7.62mm 0.3"

    7 Segment Display Common Cathode High Efficiency Red 7.62mm 0.3"

    7 Segment Display Common Cathode High Efficiency Red 7.62mm (0.3") 2000mcd.

    Z76RC
    £2.00
  • Hyper Bright White 5mm Water Clear LED 30,000mcd

    Hyper Bright White 5mm Water Clear LED 30,000mcd

    Hyper Bright White LED

    Pure White (not Warm White)

    5mm Water Clear. 30,000mcd  3.3v  30mA

    Max 50mA

    W5A
    £0.95
  • Data Logger Shield with Real Time Clock for Arduino

    Data Logger Shield with Real Time Clock for Arduino

    Data Logger Shield with Real Time Clock for Arduino Uno 

    This Arduino compatible shield allows the logging and storage data from an Arduino project to an SD card.

    Having a built in Real Time Clock (RTC) insures data accuracy over long time periods and at times where your project may suffer from power loss. Supplied with a CR1220 lithium battery. 

    AUDL
    £4.50
  • ATmega328P IC Microprocessor 28 Pin DIL  Integrated Circuit (IC)

    ATmega328P IC Microprocessor 28 Pin DIL Integrated Circuit (IC)

    ATmega328P IC Microprocessor 28 Pin DIL

    ATmega328P
    £7.50
  • Buck Converter DC-DC Step Down 3A Voltage regulator

    Buck Converter DC-DC Step Down 3A Voltage regulator

    3A DC-DC Step Down Voltage Regulator (Buck Converter)

     
    This tiny step down voltage regulator uses high frequency switching to make a very efficient DC-DC converter. It can take 4.5V to 28V and lower it to between 0.8V and 20V at up to 3A (output). The voltage is set with the small in built potentiometer.
     
    Voltage in : 4.5V - 28VDC
    Voltage out : 0.8V- 20VDC
    Switching Frequency : 1 - 1.5MHz
    Maximum Output Current : 3A
    Dimensions : 22mm x 17mm
    BCD3A
    £2.50
  • WS2812 High Brightness Individually Addressable RGB LED Strip Cut to Length

    WS2812 High Brightness Individually Addressable RGB LED Strip Cut to Length

    WS2812 RGB LED Strip Cut to Length 

    The WS2812 is a smart RGB (Red, Green, Blue) LED module that is capable of displaying up to 16,777,216 colours at 256 different levels of brightness per LED. Each LED can be controlled individually using a microcontroller (e.g. Arduino, NodeMCU).

    The LEDs are mounted on a flexible PCB and are cut to length (minimum 10 LEDs, max. 720 LEDs). 

    Specifications:

    LED Density: 144 LEDs/metre
    Input Voltage: 5V DC


    WS2812B-S
    £0.30

Send to Friend

: *
: *
: *
Type the characters you see in the picture:


*

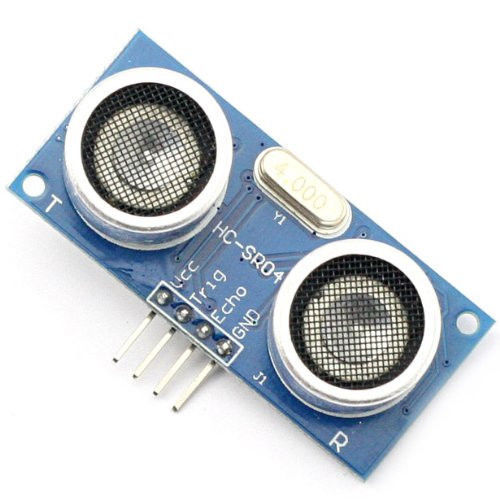
Ultrasonic ranging module for Arduino and other microcontroller projects

 
This is a module with a 40kHz ultrasonic transmitter / receiver pair mounted on the front of a small PCB, with the required control circuitry on the back.
It sends a short 40kHz square wave out, and calculates the distance by recording the time it takes the wave to return to the sensor.
 
Voltage : 5VDC
Working Range : 20mm to 4500mm
Accuracy : 2mm


Example project: 

 
HC SR04 Distance Measurement Tool
 
This article will demonstrate how to build a simple distance measuring device using the HC SR05 ultrasonic sensor board. This project can be used standalone as a way of measuring short distances or, it can be incorporated into other projects that require distance measuring. This sensor works best when the two transceivers are parallel to a solid surface, at a distance between 2cm to 450cm. 
 
Here’s what you will need:
 
Tools
Step 1
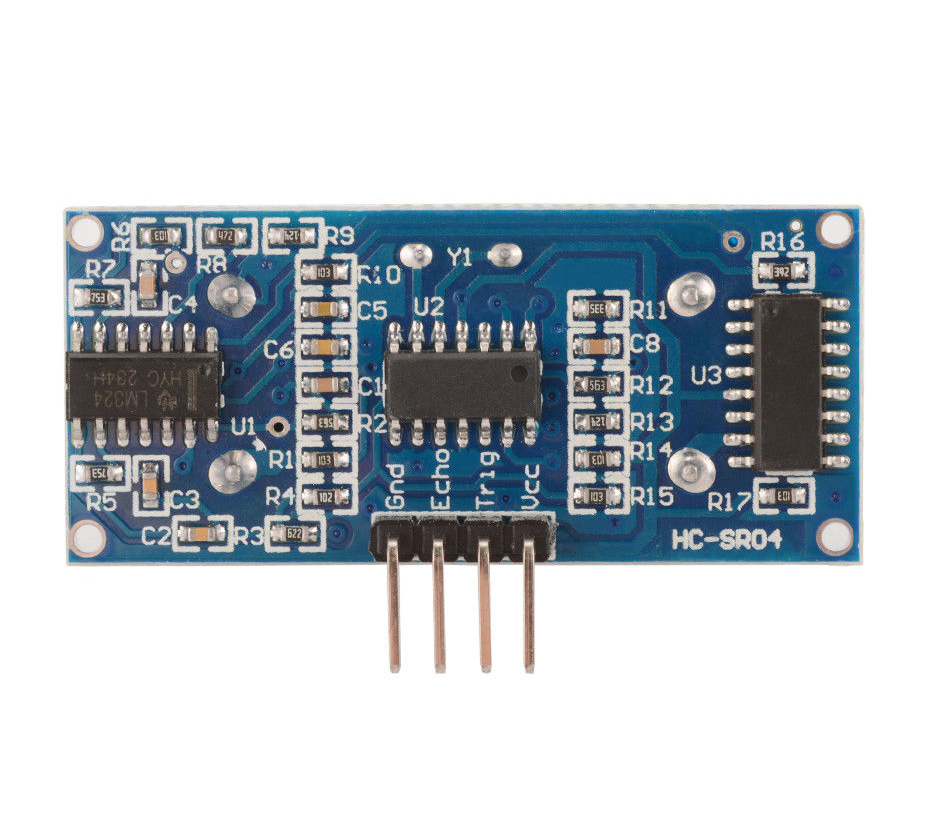
First, you will need to connect the HCSR04 sensor to the Arduino. Simply use the male to female jumper leads to connect the two together as described below and in fig.1:

HCSR04                                      Arduino
VCC-----------------------------------------5V
Trig------------------------------------------D3
Echo----------------------------------------D2
GND---------------------------------------GND
 
Step 2
Solder the KY1602 module onto the 1602 LCD screen. Pin 1 on the KY1602 module is the one closest to the 4 data and power pins. Once soldered, you can now connect the LCD display to the Arduino as shown in fig. 1.


                                                                               fig. 1


Step 3
Connect the Arduino to a computer and install the libraries mentioned above. If you need help installing the libraries, CLICK HERE for a quick tutorial.
 

Step 4
You can now start writing the code to get this all working:


First, clear the IDE window. Then, include the aforementioned libraries:
 
 
#include <HCSR04.h>
#include <LCD_I2C.h>


Initialize the HCSR04 sensor. The numbers in the brackets correspond to the trigger and echo pins respectively:

 
HCSR04 hc(3, 2);


Initialize the KY1602 I2C LCD driver (address 0x27 in this example) and specify the LCD display (in this case 16 characters, 2 rows):

LCD_I2C lcd(0x27, 16, 2);


Begin the void setup function. Initialize the LCD screen and turn on the backlight:

 
void setup()
{
  lcd.begin();
  lcd.backlight();
} 


Begin the void loop function. Set the cursor to the first character:

void loop()
{
 lcd.setCursor(0,0);


Print the distance calculated by the sensor on the LCD screen:

 lcd.print(hc.dist());


Add 100ms delay:

delay(100); 
}


The completed code should look like this:

#include <HCSR04.h>
#include <LCD_I2C.h>

HCSR04 hc(3, 2);
LCD_I2C lcd(0x27, 16, 2);

void setup()
{
  lcd.begin();
  lcd.backlight();
}

void loop()
{
 lcd.setCursor(0,0);
 lcd.print(hc.dist());
 delay(100); 
}


Step 5
Press the “Upload” button at the top (button with tick, located below “File”). The IDE will now compile the code and upload it to your Arduino (this will take a few moments).
 
Step 6
All done! The LCD will now start to display the distance calculated by the sensor.


Recently Viewed


Trustpilot