The cookie settings on this website are adjusted to allow all cookies so that you have the very best experience. If you continue without changing your cookie settings, we'll assume that you are happy to receive all cookies on our website. However, if you would like to, you can change your settings at any time using the Change cookie settings link in the Special menu. 
    
 
+44 (0)20-84520161 Contact Us
Now FREE Delivery on UK mainland orders over £30+VAT

Temperature and humidity module for Arduino KY-015

  • Details

  • Recommended

  • Send

Details

Item Number
KY015
Item Condition
New
Price
£2.50 (inc VAT £3.00)

Options

Quantity


  • Prototype Breadboard with 400 points

    Prototype Breadboard with 400 points

    Solderless Plug-In Breadboard 0.1 inch - 2.54mm spacing.

    400 Points. 2 x 30 x 5 commoned points. 4 rows of 25 points. Self-adhesive backing, or use free-standing.

    deal for experiments & prototyping.

    BB400T
    £4.00
  • 32 Pin Turned pin 0.1" Strip

    32 Pin Turned pin 0.1" Strip

    Turned Pin Socket. Copper Alloy contacts 32 pin Single in Line.2.54mm spacing

    Snap-off at any point. Can be used for transistor & other component sockets

    SIL32
    £1.25
  • Nylon Nut M3 Pack of 10

    Nylon Nut M3 Pack of 10

    Nylon Nut. M3 (3mm dia Metric thread) 10 pack

    30YNT
    £0.75
  • Nylon Slotted Cheese Head Screws 12mm Long 10 pack

    Nylon Slotted Cheese Head Screws 12mm Long 10 pack

    Nylon Cheesehead Screw Slotted. M3 (3mm dia Metric thread) 12mm long. 10 pack

    30Y12T
    £0.75
  • Spare Sponge for Soldering Iron Stand

    Spare Sponge for Soldering Iron Stand

    Sponge (keep wet).for Soldering Iron Stand

    Fits many models inc our SISS

    SPSS
    £1.25
  • Arduino Nano Revision 3 Development Board

    Arduino Nano Revision 3 Development Board

    Arduino compatible board with the ATMEGA328P microcontroller

    The Arduino Nano is a small, breadboard-friendly version of the Arduino UNO.

    It has the same functionality as the Arduino Duemilanove but at a much smaller size.

    The Arduino Nano is well suited for rapid prototyping and as a great general-purpose microcontroller. 

    Since Arduino is open source hardware & software, anyone can copy the Arduino Nano boards exactly, even using original parts.

    We are therefore able to supply this Arduino identical compatible board at a fraction of the cost of the original.

    Key Features

    Variable Input Voltage (7-12V)

    Indicator LEDs for immediate feedback

    Compact Form Factor (45mm x 19mm)

    14 Digital I/O pins

    8 Analog I/O pins

    16 MHz clock speed

    32kb flash memory (of which 2kb is used by the bootloader)


    Software can be downloaded from the Arduino website here

    https://www.arduino.cc/en/Main/Software

    Arduino Quick Start Guide


    Installing the Arduino IDE

    1. Go to arduino.cc/en/software and download the appropriate version for your system.
    2. Run the installation file (usually called arduino-1.xx.xx-windows.exe).
    3. Follow the on-screen instructions to complete the installation process.
       

    Connecting the Arduino to a computer

    1. Connect the Arduino to your computer using the USB cable provided.
    2. Open the Arduino IDE and click on “Tools”. When prompted by windows firewall click allow.
    3. Move the cursor over “Board” and select your Arduino board from the list (e.g. “Arduino Nano”).
    4. Click on “Tools” again and move the cursor over “Port”. Now, select the USB port where the Arduino is plugged in. If you have multiple devices under “Ports” and you are unsure which one is the Arduino, try selecting one of the ports and then click on “Tools” and select “Get board info”. If the Arduino port is selected, a small window displaying the board information will appear, otherwise keep trying different ports until the window appears.
    5. To check if the Arduino is connected correctly, click on the “Upload” button at the top of the screen (button with arrow pointing to the right) and wait for the empty sketch to upload. If no errors come up, you’re all set up and ready to go!
       

    Installing Arduino Libraries

    Method 1

    1. Open the Arduino IDE and click on “Tools” at the top of the screen.
    2. Click on “Manage Libraries”.
    3. Type in the name of the library you wish to install (e.g. “CCS811”) and press enter.
    4. The Library Manager will now display a number of relevant libraries. Hover the cursor over the required library and click “Install”. When the installation has finished, close the Library Manager window.


    Method 2

    1. Download the library you wish to install.
    2. Extract the folder from the zip file and paste it in the following location:

             Windows XP and above: C:\Users\%username%\Documents\Arduino\Libraries

             Mac: /Users/<username>/Documents/Arduino/libraries/

             Linux: /usr/share/arduino/libraries/ (you must delete the dashes in the folder name, if there are any)

    1. Restart the Arduino IDE.
    AUN3
    £8.75
  • Aluminium Alloy Desoldering Pump

    Aluminium Alloy Desoldering Pump

    Aluminium Alloy Desoldering Pump

    With Heat-Resistant Silicone coated PTFE Nose. Spare Nose see DSN2

    DSP5
    £3.75
  • GY68 Barometric Pressure Sensor module for Arduino BMP180

    GY68 Barometric Pressure Sensor module for Arduino BMP180

    Barometric pressure sensor module for Arduino and other microcontroller projects

     
    This tiny module has a BMP180 precision pressure sensor soldered on to a GY-68 breakout board to make it easy to use this amazing sensor. The BMP180 will give you accurate pressure data via the standard I2C protocol making it simple to add to your project.
     
    Voltage : 1.8 - 3.6VDC
    Preasure Range 300hPa to 1100hPa (-500m to 9000m)
    Current consumption 0.5µA
    Size 13x10mm
    GY68
    £2.50
  • Buck Converter DC-DC Step Down 3A Voltage regulator

    Buck Converter DC-DC Step Down 3A Voltage regulator

    3A DC-DC Step Down Voltage Regulator (Buck Converter)

     
    This tiny step down voltage regulator uses high frequency switching to make a very efficient DC-DC converter. It can take 4.5V to 28V and lower it to between 0.8V and 20V at up to 3A (output). The voltage is set with the small in built potentiometer.
     
    Voltage in : 4.5V - 28VDC
    Voltage out : 0.8V- 20VDC
    Switching Frequency : 1 - 1.5MHz
    Maximum Output Current : 3A
    Dimensions : 22mm x 17mm
    BCD3A
    £2.50

Send to Friend

: *
: *
: *
Type the characters you see in the picture:


*

What is the KY-015 DHT11 Module?

The KY015 is a temperature and humidity module for Arduino and other microcontroller projects


KY-015 module has a DHT11digital temperature and humidity sensor and a resistor. The DHT11 uses a thermistor for the temperature sensing and a capacitive humidity sensor along with an internal IC to give a digital output for both temperature and humidity.


Voltage : 3.3 to 5VDC

Humidity range : 20% to 90% @ 5% RH accuracy

Temperature range : 0C to 50C at 2C accuracy

Size 30x15mm


How Can I use the KY-015 Module to monitor temperature and humidity?

Here is an example project to measure temperature and humidity using the KY015 module and an Arduino Uno


Temperature and Humidity Sensor

In this project, we will be building a weather station that can measure both temperature and humidity.

This is what you will need:

Tools

Jumper Leads (male to female)


Components

Arduino Uno x 1 or Arduino Nano x 1

KY-15 sensor module


Libraries

DHT Sensor Library

Adafruit Unified Sensor Library


Step 1

First you will nedd to assemble the project. Connect everything together using the wiring diagram bellow for reference.


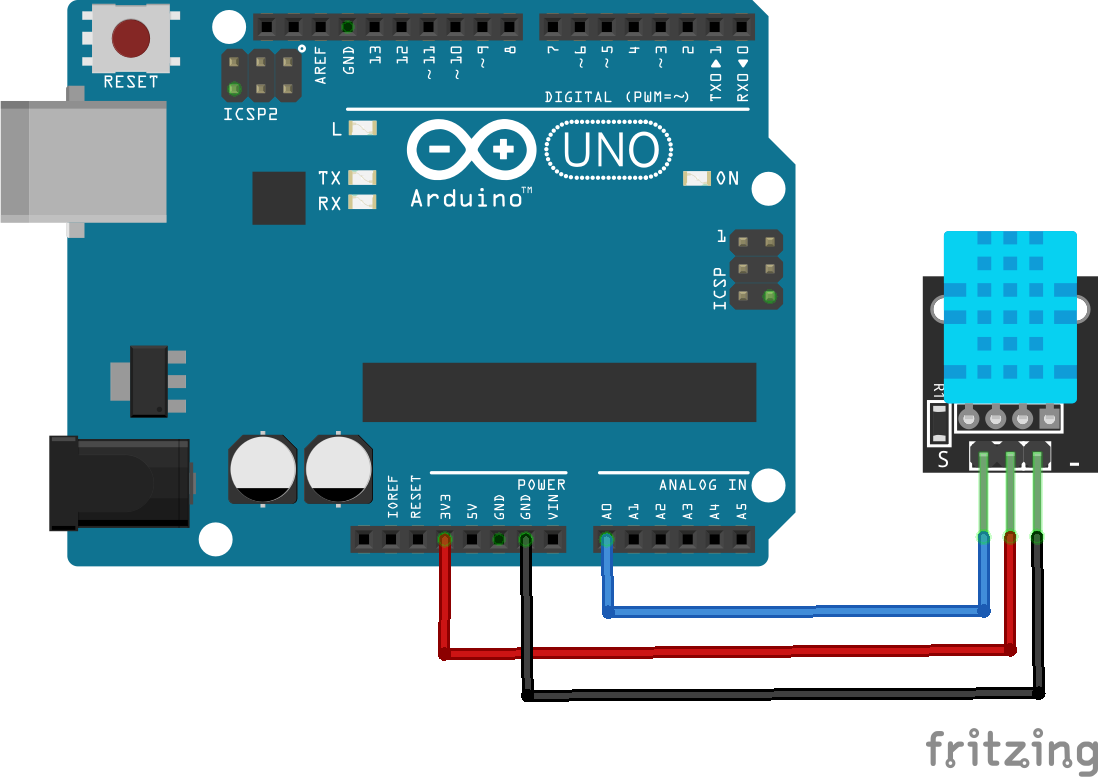
Connect the KY-015 sensor module to the Arduino

KY-015                        Arduino   

Ground - - - - - - - - - -  Ground
Vcc - - - - - - - - - - - - - - 3v3
Data - - - - - - - - - - - - -  A0

A 10KΩ pull-up resistor is built in to the KY-015


Step 2

Connect your Arduino to the PC and install the above Libraries. If you don’t know how to do this, CLICK HERE and follow the “Installing Arduino Libraries” section.


Step 3

We can now create the code to get this all working

First, delete the code in the IDE window, then include the aforementioned libraries:  

#include "DHT.h"

This bit of code imports the DHT library and links it to the sketch.

#define DHTPIN A0
#define DHTTYPE DHT11

This bit of code defines which pin is KY015 connected to and sets the type of sensor (KY015 uses DHT11)

DHT dht(DHTPIN, DHTTYPE);

This bit of code initialises the sensor

void setup() {
  Serial.begin(115200);
  Serial.println(F("DHT11 test!"));
  dht.begin();
}

The setup bit of code initialises serial output with baud rate of 115200 and prints DHT11 test! In the console

void loop() {
	  delay(2000);

This bit makes the Arduino wait 2 seconds between measurements

  float h = dht.readHumidity();

Read humidity from the sensor

  float t = dht.readTemperature();
Read temperature from the sensor
  Serial.print(F("Humidity: "));
  Serial.print(h);
  Serial.print(F("%  Temperature: "));
  Serial.print(t);
  Serial.println(F("°C "));
}

Print the latest reading in serial monitor


Finished Code:

#include "DHT.h"

#define DHTPIN A0     // Digital pin connected to the DHT sensor
#define DHTTYPE DHT11   // DHT 11
DHT dht(DHTPIN, DHTTYPE);

void setup() {
  Serial.begin(115200);
  Serial.println(F("DHT11 test!"));

  dht.begin();
}

void loop() {
  delay(2000);

  float h = dht.readHumidity();
  float t = dht.readTemperature();

  Serial.print(F("Humidity: "));
  Serial.print(h);
  Serial.print(F("%  Temperature: "));
  Serial.print(t);
  Serial.println(F("°C "));
}


Recently Viewed


Trustpilot