The cookie settings on this website are adjusted to allow all cookies so that you have the very best experience. If you continue without changing your cookie settings, we'll assume that you are happy to receive all cookies on our website. However, if you would like to, you can change your settings at any time using the Change cookie settings link in the Special menu. 
    
 
+44 (0)20-84520161 Contact Us
Now FREE Delivery on UK mainland orders over £30+VAT

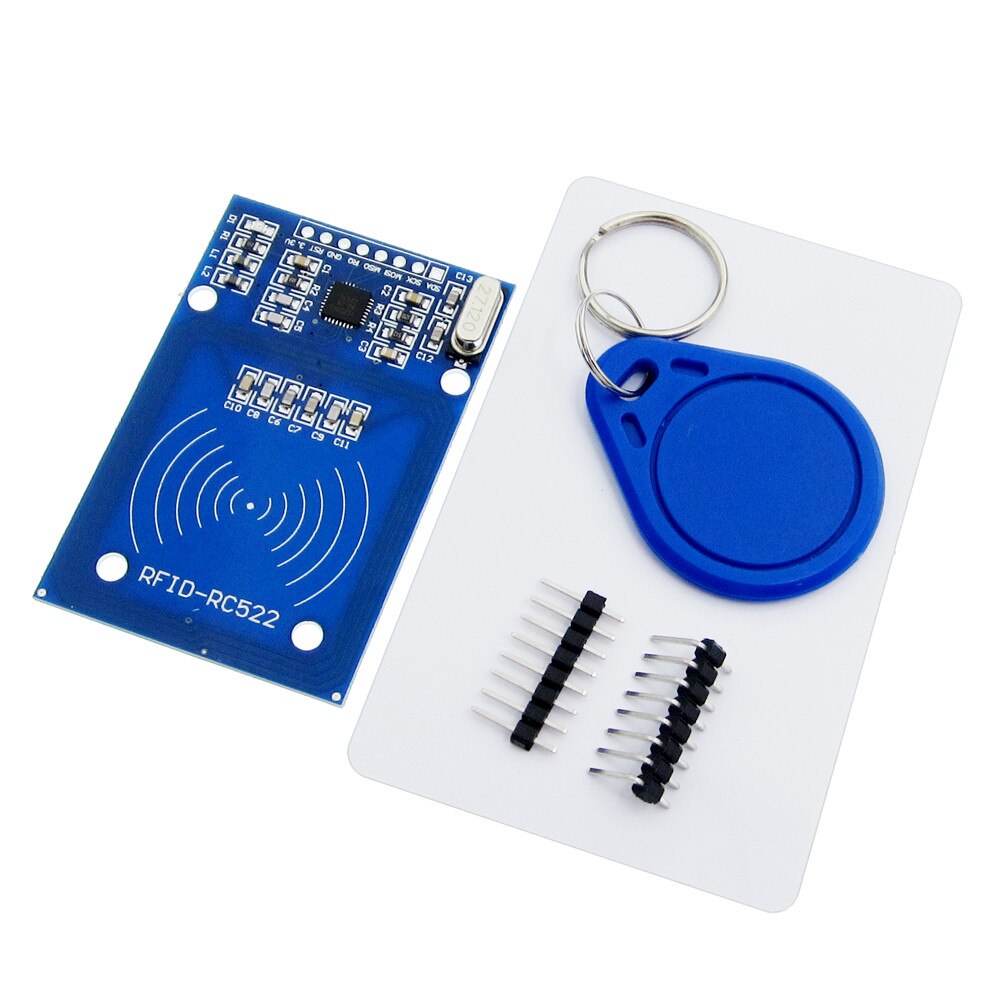
RFID Module Kit with Card and Tag 13.56Mhz

  • Details

  • Recommended

  • Send

Details

Item Number
RC522
Item Condition
New
Price
£3.50 (inc VAT £4.20)

Options

Quantity


  • Red & Black Fig 8 Power or Speaker Cable 2.3 x 4.6mm 2.5 Amps. Priced in Metre Multiples

    Red & Black Fig 8 Power or Speaker Cable 2.3 x 4.6mm 2.5 Amps. Priced in Metre Multiples

    Red & Black 2 core Fig 8 Power Cable For Loudspeaker & other uses up to 2.5Amps. 2.3mm x 4.6mm diameter. Priced per Metre

    Strands: 2 x (7 x 0.18mm Cu + 7 x 0.18mm)

    CSA: 0.36mm squared

    ZL26
    £0.50
  • Prototype Breadboard with 830 points

    Prototype Breadboard with 830 points

    Solderless Prototype Plug-In Breadboard 0.1 inch - 2.54mm spacing

    Ideal for experiments & teaching. 830 Points. 2 x 63 x 5 and 4 x 10 commoned points.

    63 rows of 5 points. Self-adhesive backing (or use free-standing).

    Can be used over and over again for prototyping circuits.

    Useful numbered grid. Accepts IC sockets, ICs and pin strips, transistors, resistors capacitors, LEDs, diodes, wire, etc

    BB830
    £5.25
  • Arduino Uno Revision 3 Development Board

    Arduino Uno Revision 3 Development Board

    UNO R3 Arduino-compatible board with the ATMega328P, ATMega16U2 and CH340G serial converter

    Since Arduino is an "Open Source" hardware as well as software; anyone can duplicate the Arduino Uno R3 boards exactly, even using original parts, this means we are able to supply this Arduino compatible board at a fraction of the cost of the original but still working identicaly to the original.

    The UNO is the best board to get started with electronics and coding. If this is your first experience tinkering with the platform, the UNO is the most robust board you can start playing with. The UNO is the most used and documented board of the whole Arduino family.

    Arduino Uno is a microcontroller board based on the ATmega328P. It has 14 digital input/output pins (of which 6 can be used as PWM outputs), 6 analog inputs, a 16 MHz quartz crystal, a USB connection, a power jack, an ICSP header and a reset button. The development board has everything needed to support the microcontroller to help you create an endless amount of projects and if you are just starting then the worldwide Arduino community is full of ideas, guides and help to get you started or help you complete your project. 
     
    Supplied 
    1 x Arduino Compatible Uno R3 development board
    1 x USB Cable
     

    Arduino Quick Start Guide


    Installing the Arduino IDE

    1. Go to arduino.cc/en/software and download the appropriate version for your system.
    2. Run the installation file (usually called arduino-1.xx.xx-windows.exe).
    3. Follow the on-screen instructions to complete the installation process.
       

    Connecting the Arduino to a computer

    1. Connect the Arduino to your computer using the USB cable provided.
    2. Open the Arduino IDE and click on “Tools”. When prompted by windows firewall click allow.
    3. Move the cursor over “Board” and select your Arduino board from the list (e.g. “Arduino Uno”).
    4. Click on “Tools” again and move the cursor over “Port”. Now, select the USB port where the Arduino is plugged in. If you have multiple devices under “Ports” and you are unsure which one is the Arduino, try selecting one of the ports and then click on “Tools” and select “Get board info”. If the Arduino port is selected, a small window displaying the board information will appear, otherwise keep trying different ports until the window appears.
    5. To check if the Arduino is connected correctly, click on the “Upload” button at the top of the screen (button with arrow pointing to the right) and wait for the empty sketch to upload. If no errors come up, you’re all set up and ready to go!
       

    Installing Arduino Libraries

    Method 1

    1. Open the Arduino IDE and click on “Tools” at the top of the screen.
    2. Click on “Manage Libraries”.
    3. Type in the name of the library you wish to install (e.g. “CCS811”) and press enter.
    4. The Library Manager will now display a number of relevant libraries. Hover the cursor over the required library and click “Install”. When the installation has finished, close the Library Manager window.


    Method 2

    1. Download the library you wish to install.
    2. Extract the folder from the zip file and paste it in the following location:

             Windows XP and above: C:\Users\%username%\Documents\Arduino\Libraries

             Mac: /Users/<username>/Documents/Arduino/libraries/

             Linux: /usr/share/arduino/libraries/ (you must delete the dashes in the folder name, if there are any)

    1. Restart the Arduino IDE.
    AUR3
    £14.00
  • I2C Parallel to Serial Converter for Arduino Type LCD Screens

    I2C Parallel to Serial Converter for Arduino Type LCD Screens

    I2C Paralel to 2 Pin Serial converter for Arduino type LCD screens

     
    This converter can be soldered directly to a standard 1602 LCD screen to convert it to the more convenient 2 pin serial (I2C) used in many Arduino projects.
    There is a removable jumper to allow connection with both backlit and non backlit screens.
    A potentiometer can adjust the brightness & contrast of the LCD.
     
     
    Connections
    GND = Ground
    VCC =  5V
    SDA = Serial Data Line
    SCL = Serial Clock Line 
     
     
    KY1602
    £2.50
  • SG90 Micro Servo 9g

    SG90 Micro Servo 9g

    SG90 Micro Servo for Arduino and other microcontroller projects

     
    This micro servo is the most popular 9g servo in the world.
    It is used for Radio Control models, robotics plus many other uses.
    Compatible with Arduino and other microcontroller projects.
    Supplied with 3 different servo horns and fixing screws.
     
     
    Voltage : 5VDC
    Speed : 60 Degrees in 0.12 second
    Torque : 1.8kg/cm
    Wire Length : 150mm
    Size : 23x12.2x29mm
    Weight : 9g
    SG90
    £2.75
  • Stepper Motor 28BYJ-48 with ULN2003 Driver Board

    Stepper Motor 28BYJ-48 with ULN2003 Driver Board

    28BYJ-48 Stepper Motor wih ULN2003 IC & Driver Board

     
    This is a 4 phase 5VDC stepper motor with 4 coils, with a step angle of either 11.25 or 5.625 degrees giving it 32 or 64 steps on the motor using either half or full steps. It also has a 1:64 gearbox built in making the steps at the shaft either 2048 or 4096. It is supplied with a ULN2003 driver board.  
     
    Voltage : 5VDC
    Step angle : 5.625 1/64
    Max Current : 300mA 
    Diameter : 28mm
    Height : 19mm
    Shaft Length : 8mm
    Driver PCB Size : 32x35mm
    28BYJ-48
    £4.50
  • Geared Motor with Wheel

    Geared Motor with Wheel

    Geared Motor with Wheel and Tyre

     
    This is a 3-9 VDC Motor with a buiIt in gearbox to give speeds of 90-300 RPM (under no load conditions). It is supplied with a 65mm wheel and tyre making it ideal for robot type car projects and more.  
     
    Voltage : 3-9VDC
    RPM : 90 - 300 no load
    Max Current : 200mA 
    Wheel Diameter : 65mm
    Shaft Length : 3.6mm
     
    GM65
    £3.50
  • USB Programmer for EPS8266 in the ESP-01 Module

    USB Programmer for EPS8266 in the ESP-01 Module

    USB Programmer for ESP-01 WiFi Module

    This programmer makes setting up the ESP-01 much easier and safer, the ESP-01 just plugs into the 8 way header on the programmer and will be provided with the correct working and programming voltages. The module uses the popular CH340 USB-UART bridge to allow the ESP-01 to easily comunicate with the USB.
     
    Voltage : 5VDC (from USB)
    Dimensions : 17mm x 34mm (49mm including USB plug)
    ESPROG
    £3.50
  • L298N Motor Driver Module

    L298N Motor Driver Module

    L298N Motor Driver Module

    This is a L298N-based motor driver module capable of accepting a logic input from an Arduino (or a similar microcontroller) in order to control bipolar stepper motors or DC motors. The module has screw terminal connectors for power input and output and a 6 pin header connector for logic input and motor control. 

    Connecting the jumper links (from ENA and ENB to 5V) allows the motors to spin at full speed, while removing them will stop the motors (unless the ENA and ENB pins are connected to the Arduino for PWM speed control).
     
    Voltage : 5VDC
    Logic current: 0mA - 36mA
    Size: 43mm x 43mm x 27mm
    L298MOD
    £4.00

Send to Friend

: *
: *
: *
Type the characters you see in the picture:


*

13.56 Mhz RFID Reader and Writer with Tag and Card for use with Arduino or other microcontrollers

A popular and easy to use RC522 RFID module, complete with an RFID card and RFID tag.

Can be used to read or write to many different RFID cards, fobs, stickers etc.

Voltage : 3.3VDC
Operating Frequency : 13.56Mhz
Dimensions : 60mm x 40mm

Recently Viewed


Trustpilot