The cookie settings on this website are adjusted to allow all cookies so that you have the very best experience. If you continue without changing your cookie settings, we'll assume that you are happy to receive all cookies on our website. However, if you would like to, you can change your settings at any time using the Change cookie settings link in the Special menu. 
    
 
+44 (0)20-84520161 Contact Us
Now FREE Delivery on UK mainland orders over £30+VAT

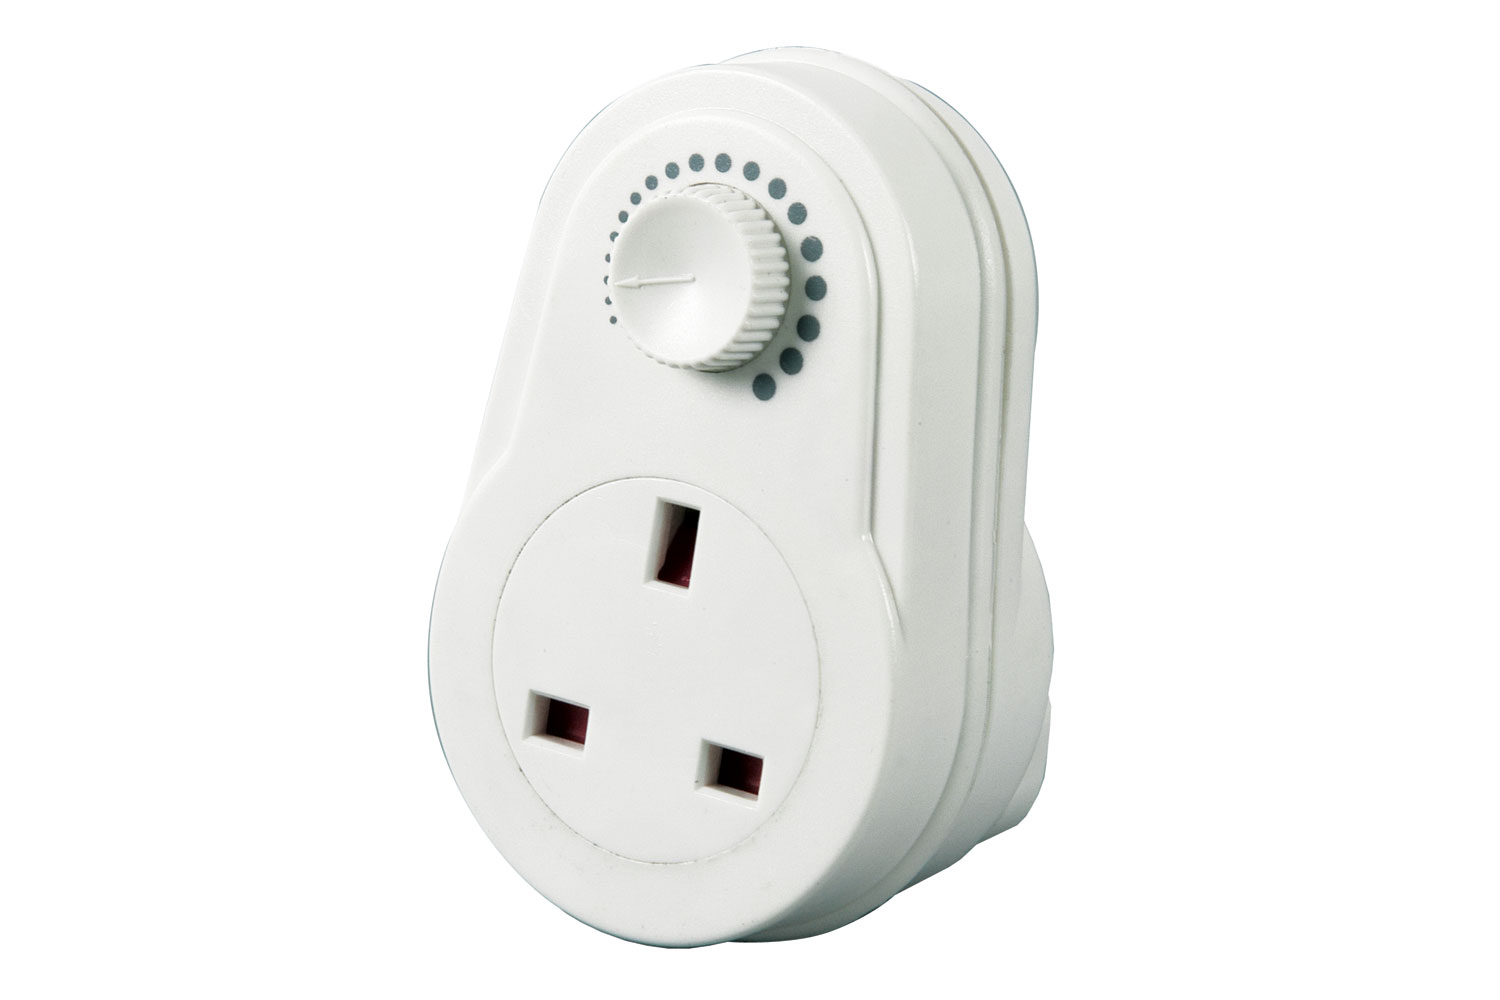
Dimmer Switch on 13A Mains Socket

  • Details

  • Recommended

  • Send

Details

Item Number
DIM13
Manufacturer
Item Condition
New
Price
£8.50 (inc VAT £10.20)

Options

Quantity


  • RCA (Phono) Plug with Black Cover

    RCA (Phono) Plug with Black Cover

    Phono (RCA) Plug. Nickel Plated Contacts with soft plastic Cover & Cable Protector. 

    5mm cable entry. Black ID

    PPFB
    £0.40
  • RCA (Phono) Plug with Red Cover

    RCA (Phono) Plug with Red Cover

    Phono (RCA) Plug. Nickel Plated Contacts with soft plastic Cover & Cable Protector.

    5mm cable entry. Red ID

    PPFR
    £0.40
  • Hammond Mfg. ABS Box 109 x 81 x 41mm (1591XXSSBK)

    Hammond Mfg. ABS Box 109 x 81 x 41mm (1591XXSSBK)

    Hammond Manufacturing Black ABS Plastic Box with Screw-down lid. 109 x 81 x 41mm

    Hammond Part no.: 1591XXSSBK

    ABS20
    £3.00
  • Black Insulating Tape 19mm wide x 20 metres long

    Black Insulating Tape 19mm wide x 20 metres long

    High Quality Black PVC Insulating Tape. 20 metres long x 19mm wide. 

    Adhesive suitable for insulation. Flame retardant properties.

    BS Standards: BS3924, BS3887, IEC 60454. 

    IT20B
    £1.00
  • 10 Metres of Brown Pure Copper Stranded Wire

    10 Metres of Brown Pure Copper Stranded Wire

    10M Brown PVC Insulated Stranded 18 Strands of Pure Copper, 1x0.14mm

    W14BN
    £1.25
  • Arduino Uno Revision 3 Development Board

    Arduino Uno Revision 3 Development Board

    UNO R3 Arduino-compatible board with the ATMega328P, ATMega16U2 and CH340G serial converter

    Since Arduino is an "Open Source" hardware as well as software; anyone can duplicate the Arduino Uno R3 boards exactly, even using original parts, this means we are able to supply this Arduino compatible board at a fraction of the cost of the original but still working identicaly to the original.

    The UNO is the best board to get started with electronics and coding. If this is your first experience tinkering with the platform, the UNO is the most robust board you can start playing with. The UNO is the most used and documented board of the whole Arduino family.

    Arduino Uno is a microcontroller board based on the ATmega328P. It has 14 digital input/output pins (of which 6 can be used as PWM outputs), 6 analog inputs, a 16 MHz quartz crystal, a USB connection, a power jack, an ICSP header and a reset button. The development board has everything needed to support the microcontroller to help you create an endless amount of projects and if you are just starting then the worldwide Arduino community is full of ideas, guides and help to get you started or help you complete your project. 
     
    Supplied 
    1 x Arduino Compatible Uno R3 development board
    1 x USB Cable
     

    Arduino Quick Start Guide


    Installing the Arduino IDE

    1. Go to arduino.cc/en/software and download the appropriate version for your system.
    2. Run the installation file (usually called arduino-1.xx.xx-windows.exe).
    3. Follow the on-screen instructions to complete the installation process.
       

    Connecting the Arduino to a computer

    1. Connect the Arduino to your computer using the USB cable provided.
    2. Open the Arduino IDE and click on “Tools”. When prompted by windows firewall click allow.
    3. Move the cursor over “Board” and select your Arduino board from the list (e.g. “Arduino Uno”).
    4. Click on “Tools” again and move the cursor over “Port”. Now, select the USB port where the Arduino is plugged in. If you have multiple devices under “Ports” and you are unsure which one is the Arduino, try selecting one of the ports and then click on “Tools” and select “Get board info”. If the Arduino port is selected, a small window displaying the board information will appear, otherwise keep trying different ports until the window appears.
    5. To check if the Arduino is connected correctly, click on the “Upload” button at the top of the screen (button with arrow pointing to the right) and wait for the empty sketch to upload. If no errors come up, you’re all set up and ready to go!
       

    Installing Arduino Libraries

    Method 1

    1. Open the Arduino IDE and click on “Tools” at the top of the screen.
    2. Click on “Manage Libraries”.
    3. Type in the name of the library you wish to install (e.g. “CCS811”) and press enter.
    4. The Library Manager will now display a number of relevant libraries. Hover the cursor over the required library and click “Install”. When the installation has finished, close the Library Manager window.


    Method 2

    1. Download the library you wish to install.
    2. Extract the folder from the zip file and paste it in the following location:

             Windows XP and above: C:\Users\%username%\Documents\Arduino\Libraries

             Mac: /Users/<username>/Documents/Arduino/libraries/

             Linux: /usr/share/arduino/libraries/ (you must delete the dashes in the folder name, if there are any)

    1. Restart the Arduino IDE.
    AUR3
    £14.00
  • 6.4mm-Self Adhesive PCB Pillars in Pack of 10

    6.4mm-Self Adhesive PCB Pillars in Pack of 10

    Pack of 10 Self Adhesive PCB Pillars in Nylon. 6.4mm length with 3M tape on base and snap-lock PCB fitting.

    For mounting PCBs without drilling.

    PPA6
    £1.75
  • 1N4007 Diode

    1N4007 Diode

    Diode, Wire Ended Rectifier 1A 1000V

    Replacement for:

    1N4001

    1N4002

    1N4003

    1N4004 

    1N4005 

    1N4006

    1N4007
    £0.10
  • I2C Parallel to Serial Converter for Arduino Type LCD Screens

    I2C Parallel to Serial Converter for Arduino Type LCD Screens

    I2C Paralel to 2 Pin Serial converter for Arduino type LCD screens

     
    This converter can be soldered directly to a standard 1602 LCD screen to convert it to the more convenient 2 pin serial (I2C) used in many Arduino projects.
    There is a removable jumper to allow connection with both backlit and non backlit screens.
    A potentiometer can adjust the brightness & contrast of the LCD.
     
     
    Connections
    GND = Ground
    VCC =  5V
    SDA = Serial Data Line
    SCL = Serial Clock Line 
     
     
    KY1602
    £2.50

Send to Friend

: *
: *
: *
Type the characters you see in the picture:


*

Mercury Dimmer Switch Fits into 13A Socket

Adjustable light intensity for use in a standard UK mains wall socket.

  • Make any lamp dimmable
  • Fits a standard UK wall socket
  • Adjustable light intensity
  • Works on both Standard & LED Lamps
  • Max Power 300W

Bestsellers

Recently Viewed


Trustpilot