The cookie settings on this website are adjusted to allow all cookies so that you have the very best experience. If you continue without changing your cookie settings, we'll assume that you are happy to receive all cookies on our website. However, if you would like to, you can change your settings at any time using the Change cookie settings link in the Special menu. 
    
 
+44 (0)20-84520161 Contact Us
Now FREE Delivery on UK mainland orders over £30+VAT

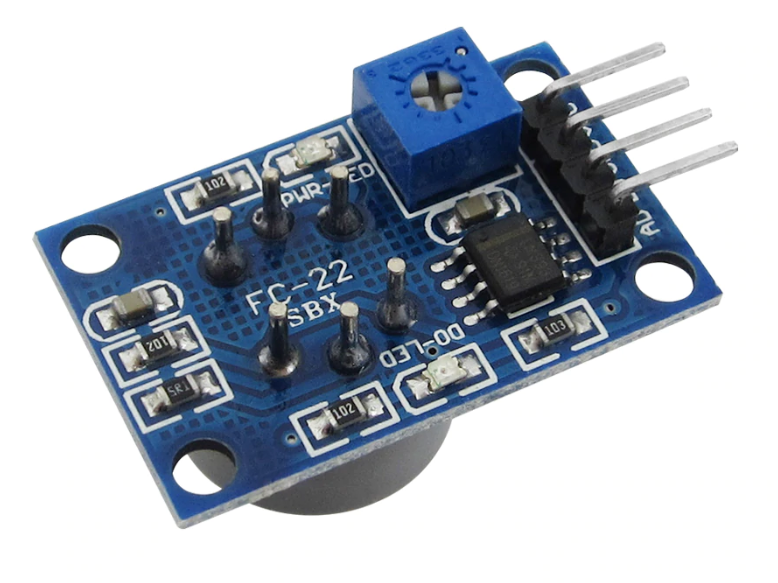
Carbon Monoxide gas sensor module for Arduino MQ-7

  • Details

  • Recommended

  • Send

Details

Item Number
MQ7
Item Condition
New
Price
£3.50 (inc VAT £4.20)

Options

Quantity


  • 2 inch 8 ohm Miniature Speaker

    2 inch 8 ohm Miniature Speaker

    2 inch 8 ohm Miniature Speaker
    50mm dia with paper cone & ferrite magnet. 240mW 8 ohms

    SX208
    £2.25
  • 40 Male to Female Jumper Cables on rainbow ribbon cable

    40 Male to Female Jumper Cables on rainbow ribbon cable

    Solderless Male to Female Jumper Leads - set of 40

    This set of coloured male to female jumper leads can be used intact, or peeled appart into small sets or single leads. Great for prototyping with Arduino, Raspbery Pi and other projects

    Keep track easily with 10 different colours for quick fault finding. 

    4 of each: Red, Orange, Yellow, Green, Blue, Grey, Purple, Brown, Black and White

    Each length: 200mm

    JL40
    £3.25
  • Data Logger Shield with Real Time Clock for Arduino

    Data Logger Shield with Real Time Clock for Arduino

    Data Logger Shield with Real Time Clock for Arduino Uno 

    This Arduino compatible shield allows the logging and storage data from an Arduino project to an SD card.

    Having a built in Real Time Clock (RTC) insures data accuracy over long time periods and at times where your project may suffer from power loss. Supplied with a CR1220 lithium battery. 

    AUDL
    £4.50
  • Digital temperature sensor module for Arduino KY-028

    Digital temperature sensor module for Arduino KY-028

    Digital temperature sensor module for Arduino and other microcontroller projects

     
    This module uses an NTC thermister to sense the temperature. It also has a comparator to give a digital output as well as an analogue output and a potentiometer to adjust the level for the digital output.
     
    Voltage : 5VDC
    Size 36x16mm
    KY028
    £2.50
  • 40 Female to Female Jumper Cables on rainbow ribbon cable

    40 Female to Female Jumper Cables on rainbow ribbon cable

    Solderless Female to Female Jumper Leads in a set of 40

    This set of coloured female to female jumper leads can be used together or peeled apart into smaller sets or single leads. They are great for prototyping with boards like Arduinos and Raspberry Pi.

    With 10 different colours and 4 of each colour, it's easy to keep track for quick fault finding. 

    Colours: Red, Orange, Yellow, Green, Blue, Grey, Purple, Brown, Black and White

    Length: 200mm

    JL40F
    £3.25
  • GY68 Barometric Pressure Sensor module for Arduino BMP180

    GY68 Barometric Pressure Sensor module for Arduino BMP180

    Barometric pressure sensor module for Arduino and other microcontroller projects

     
    This tiny module has a BMP180 precision pressure sensor soldered on to a GY-68 breakout board to make it easy to use this amazing sensor. The BMP180 will give you accurate pressure data via the standard I2C protocol making it simple to add to your project.
     
    Voltage : 1.8 - 3.6VDC
    Preasure Range 300hPa to 1100hPa (-500m to 9000m)
    Current consumption 0.5µA
    Size 13x10mm
    GY68
    £2.50
  • CJMCU-811CO2 VOC Air quality Module with CCS811 for Arduino and other microcontroller projects

    CJMCU-811CO2 VOC Air quality Module with CCS811 for Arduino and other microcontroller projects


    What is the CJUMCU-811 Module?

    CO2 and VOC indoor air quality sensor module for Arduino and other microcontroller projects

    This module has a CCS811 module that is an ultra low powered digital gas sensor using a metal oxide multi compound sensor. The module uses the onboard MCU to manage the sensor and provide the needed Analogue to Digital conversion and I2C interface making it simple to add to your project. It will detect a wide range of VOCs including Carbon Monoxide and can convert this to an eCO2 (equivalent CO2) value.
     

    Voltage: 3.3VDC 

    Size: 21x15mm
     

    How Can I use the CJUMCU-811 to test air quality and CO2 levels?


    Here is an example project for an air quality meter using the CJUMCU-811, an Arduino Uno and a 1602 LCD screen with a KY1602 to display CO2 levels and air quality:


    Air Quality Sensor with LCD

    In this project, we will be building an air quality station that can measure eCO2 (estimated carbon dioxide) levels and a wide range of VOCs (Volatile Organic Compounds). High VOC levels can contribute to a wide range of health complications and high CO2 levels (>1000ppm) can impair normal cognitive function, so it is useful to be able to monitor them.


    Here’s what you will need:
     

    Tools
    Soldering Iron
    Solder
    Jumper Leads (male to female)

    Components
    CJMCU811 x 1
    LCD1602B LCD screen x1
    Arduino Uno x 1 or Arduino Nano x 1
    KY1602 Parallel to Serial converter
     

    Libraries

    CCS811 Arduino Library

    PCF8574 Arduino Library


    Step 1
    First you will need to assemble the project. The CJMCU should come with a set of pin headers that need to be soldered directly on it and the KY1602 should be soldered directly to the back of the LCD screen. Now, connect everything together using the wiring diagram below for reference.


    Connecting the CJMCU811 to an Arduino       Connecting the KY1602 to an Arduino and a 1602 LCD 
    CJMCU                           Arduino                     KY1602                          Arduino            LCD
    VCC----------------------------3.3V                       VCC-----------------------------5V
    GND----------------------------GND                      GND----------------------------GND
    SCL------------------------------A5                        SCL-----------------------------A5
    SDA-----------------------------A4                         SDA-----------------------------A4
                                                                            Pins 1-16---------------------------------------Pins 1-16*


     *pin 1 on the KY1602 is the one nearest to the 4 data and power pins


    Step 2
    Connect your Arduino to the PC and install the above Libraries. If you don’t know how to do this, CLICK HERE and follow the “Installing Arduino Libraries” section.

    Step 3
    We can now create the code to get this all working:

    First, delete the code in the IDE window, then include the aforementioned libraries:  

     
    #include <LCD_I2C.h>
    #include <Wire.h>
    #include "SparkFunCCS811.h"


    Now, We need to declare the I2C devices and their addresses:  

     
    #define CCS811_ADDR 0x5B
    LCD_I2C lcd(0x27, 16, 2);
    CCS811 sensor(CCS811_ADDR);


    Initialize the I2C devices and turn on lCD backlight in the setup function:

     
    void setup()
    {
      Wire.begin();
      lcd.begin();
      lcd.backlight();


    Start serial communication  

    Serial.begin(115200);
    delay(1000);

    Check to see if the CJMCU is configured correctly, otherwise display error message:

     
    if (sensor.begin() == false)
      {
      Serial.print("Sensor error. Check connection");
      while (1);
      }


    Starting the void loop function. Check to see if the data from the sensor is available, and if so, read and calculate the results:

     
    if (sensor.dataAvailable())
      {
      sensor.readAlgorithmResults();


    Send the data via serial port:

     
    Serial.print("CO2[");
      Serial.print(sensor.getCO2());
      Serial.print("] tVOC[");
      Serial.print(sensor.getTVOC());


    Display the same data on the LCD display:

     
    lcd.setCursor(0,0);
    lcd.print("Est. CO2 - ");
      lcd.print(sensor.getCO2());
      lcd.setCursot(0,1);
    lcd.print("Tot. VOC - ");
      lcd.print(sensor.getTVOC());
      }


    Add 10ms delay to prevent overloading the I2C bus:

     
    delay(10);


    The completed code should look like this:


    /* 
    Connecting the CJMCU811 to an Arduino Uno or an Arduino Nano: 
    
    CJMCU811 Arduino
    VCC-------------->3V3
    GND-------------->GND
    SCL-------------->A5
    SDA-------------->A4
    */
     
    #include <lcd_i2c.h>
    #include <wire.h>
    #include "SparkFunCCS811.h"
    LCD_I2C lcd(0x27, 16, 2); //Address of the KY1602 module
    #define CCS811_ADDR 0x5A //if it doesn't work, change to 0x5B
    
    CCS811 sensor(CCS811_ADDR);
    
    void setup()
    {
      Wire.begin(); //Initialize I2C Hardware
    
      lcd.begin(); // If you are using more I2C devices using the Wire.h library, use lcd.begin(false)
    
      lcd.backlight();
    
      Serial.begin(115200);  //Starting serial communication
      delay(1000);
    
     
      if (sensor.begin() == false)
      {
      Serial.print("Sensor error. Check connection");
      while (1);
      }
    }
    
    void loop()
    {
      if (sensor.dataAvailable())//Check to see if data is ready with .dataAvailable(). if statement checking to see 
      {
      //If so, have the sensor read and calculate the results.
      sensor.readAlgorithmResults();
     
      Serial.print("CO2["); //Returns estimated CO2 reading
      Serial.print(sensor.getCO2());
      Serial.print("] tVOC[");//Returns calculated total VOC reading
      Serial.print(sensor.getTVOC());
    
      lcd.setCursor(0,0);
      lcd.print("Est. CO2 - ");
      lcd.print(sensor.getCO2());
      lcd.setCursor(0,1);
      lcd.print("Tot. VOC - ");
      lcd.print(sensor.getTVOC());
      }
      delay(10); //Prevents overloading of the I2C bus
    }


    Step 4 Press the “Upload” button at the top (button with tick, located below “File”). The IDE will now compile the code and upload it to your Arduino (this may take a few moments).

    Step 5 To check if everything is working, open the serial monitor from the Arduino IDE (magnifying glass button in the top right corner) and see if you can get a reading. The CJMCU has to be left on for 24 hours before it will give a correct reading. If everything is connected correctly, the LCD should also show readings from the sensor.

    Step 6 That’s it! You should now have a fully working air quality sensor. Now all you need to decide is what sort of enclosure you want to put it in. You can look at our high quality boxes HERE for ideas.


    CJMCU811
    £16.50
  • PIR Sensor Module for Arduino

    PIR Sensor Module for Arduino

    PIR sensor module for Arduino and other microcontroller projects

     
    The HCSR501 is a PIR (Passive Infra-Red) sensor that can detect the presence of people by measuring the infrared radiation radiated by the body. It can be used in a vast and diverse number of projects, including but not limited to: automated lighting systems, burglar alarms, automated door systems, etc.

    Principle of operation
    All objects with a temperature above absolute zero (0 kelvin) emit electromagnetic radiation. The higher the temperature of the object, the smaller the wavelength of the radiation emitted. The normal human body temperature is 37°C (310.2 kelvin) and it therefore emitts infrared radiation (mostly at a wavelength of 12µm). The PIR sensor can sense when a person has walked into its field of view by measuring the difference in the infrared radiation received from the ambient environment and the human body. 
     
    Voltage : 5-20VDC
    Power Consumption: 64mA
    Logic output: 3.3V
    Range: 7 metres, (<120°)
    Lock Time: 200 miliseconds
    Operating temperature range: between -15°C and 70°C
     
    HCSR501
    £2.50

Send to Friend

: *
: *
: *
Type the characters you see in the picture:


*

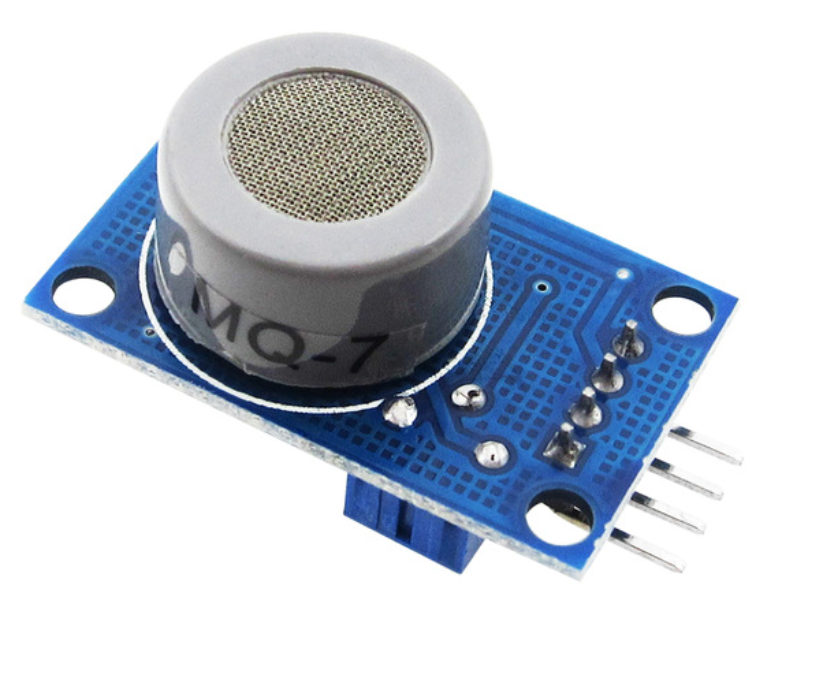
Carbon Monoxide sensor module for Arduino and other microcontroller projects

 
A Carbon Monoxide sensor detects CO in normal air conditions.
The resistance of the sensor changes with CO levels giving a varying voltage on the analogue pin. A comparator supplies a digital output when the CO level reaches a certain level, set with the built in potentiometer.
 
Please note, this sensor needs to run for 24-48 hours before first time use
 
Voltage : 5VDC
Current : 100mA
Sensitivity : 10 to 10000ppm
Size 32x21mm

Recently Viewed


Trustpilot